Simple but sophisticated duplicate-record detection so you can have the cleanest possible database. Define the fields that you want to compare, and then manually review the matches or set Sugar to auto-merge them based on the rules you've set. Upgrade your add-on to detect cross-module duplicates, or to deduplicate your upload files and reduce storage in your Sugar filesystem!
User Guide
Prerequisites
System requirements for installation
Supported Versions
- 11.x
- 12.x
Supported Editions
- Sell
- Serve
- Enterprise
- Professional
Supported Databases
- MySQL
- MSSQL
- Oracle
- DB2
Supported Languages
- English
Overview
Upsert® Deduplicate is a data integrity tool for Sugar that allows a user to identify and merge potential duplicate records based on defined criteria. Users have the ability to manually merge records or configure rules for automatically merging records.
Upsert® Deduplicate is available to all users.
Installation
Once you complete your order for the Upsert® Trash Bin plug-in, you should receive an email with instructions to download the necessary file. Complete these steps to install the plug-in to your Sugar instance:
- Log in to your Sugar instance as an admin user
- Go to Admin > Module Loader
- Select the Upsert® Deduplicate ZIP file and click ‘Upload’
- Click the ‘Install’ button
- Review the license agreement, toggle the option to ‘Accept’, and click ‘Commit’
Once the installation completes, proceed to the ‘Configuration' section.
Configuration
Once Upsert® Deduplicate is installed, you will need to enter your license key to enable functionality on the Configurations page.
Configuring the License
Enable the functionality of the plugin via the following steps:
- Go to Admin, and select ‘Configuration Settings’ from the Upsert® Deduplicate section
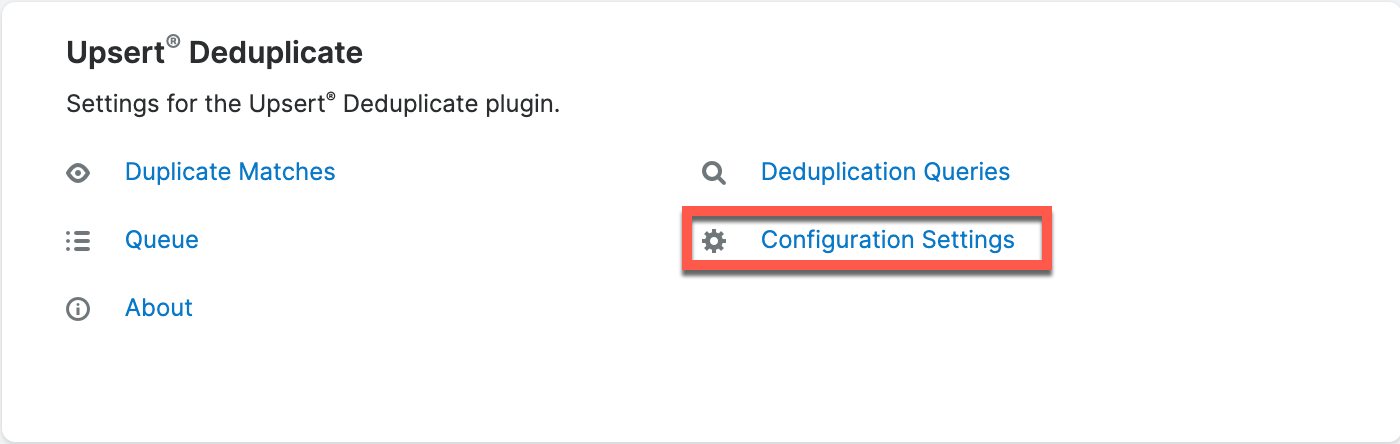
- Enter your license key that you received via email from your initial purchase.
Note: If you installed and configured other Upsert® plug-ins, the license key will prepopulate into this screen and not require re-entry - Click ‘Save’
Validating the License
If access to Upsert® Deduplicate functionality is interrupted, you can manually validate your license with the following steps:
- Go to Admin, and select ‘Configuration Settings’ from the Upsert® Deduplicate section
- In the right panel, click ‘Validate License’
- If successful, the status will be updated to ‘Enabled’ and the service start and end dates will be populated.
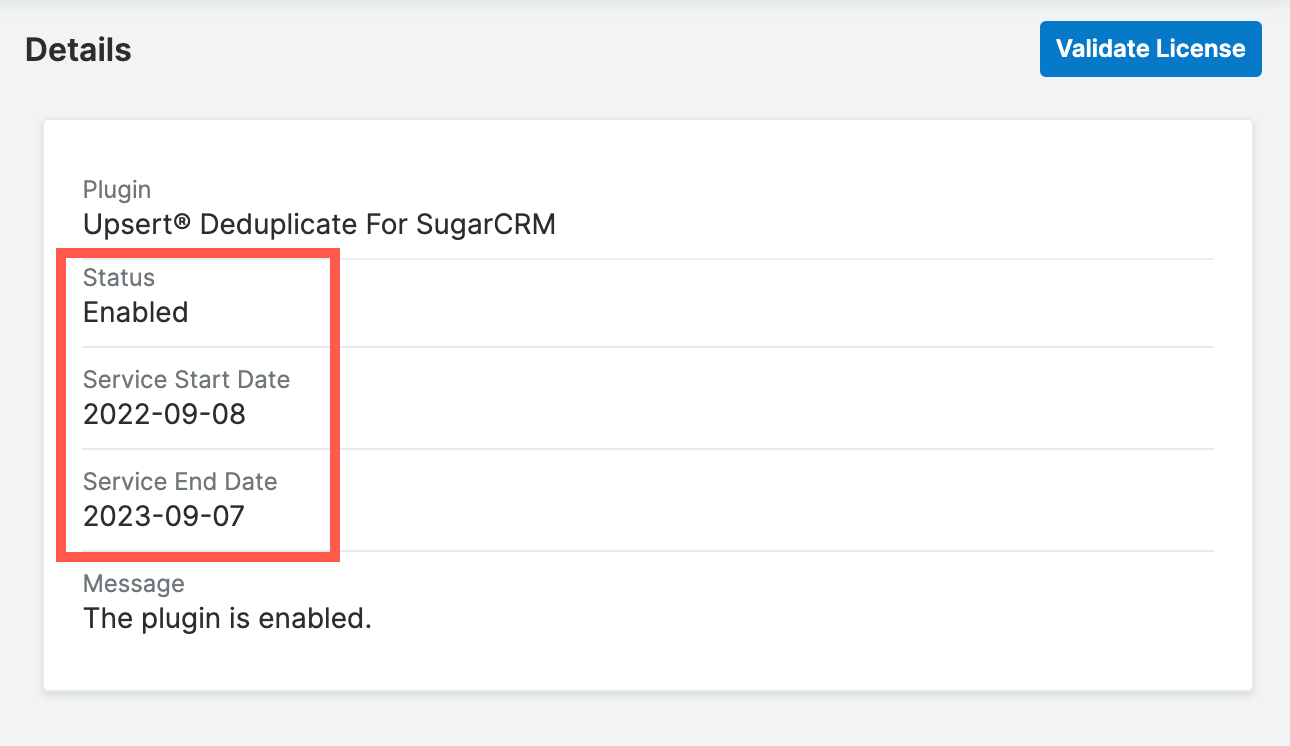
If unsuccessful, there will be a message indicating the reason for the failure with further instructions.
Note: The server hosting your Sugar instance must be able to reach https://upsertconsulting.com to successfully validate your license.
Status
In order to access the Upsert® Deduplicate functionality, confirm that the ‘Status’ field is set to ‘Enabled’.
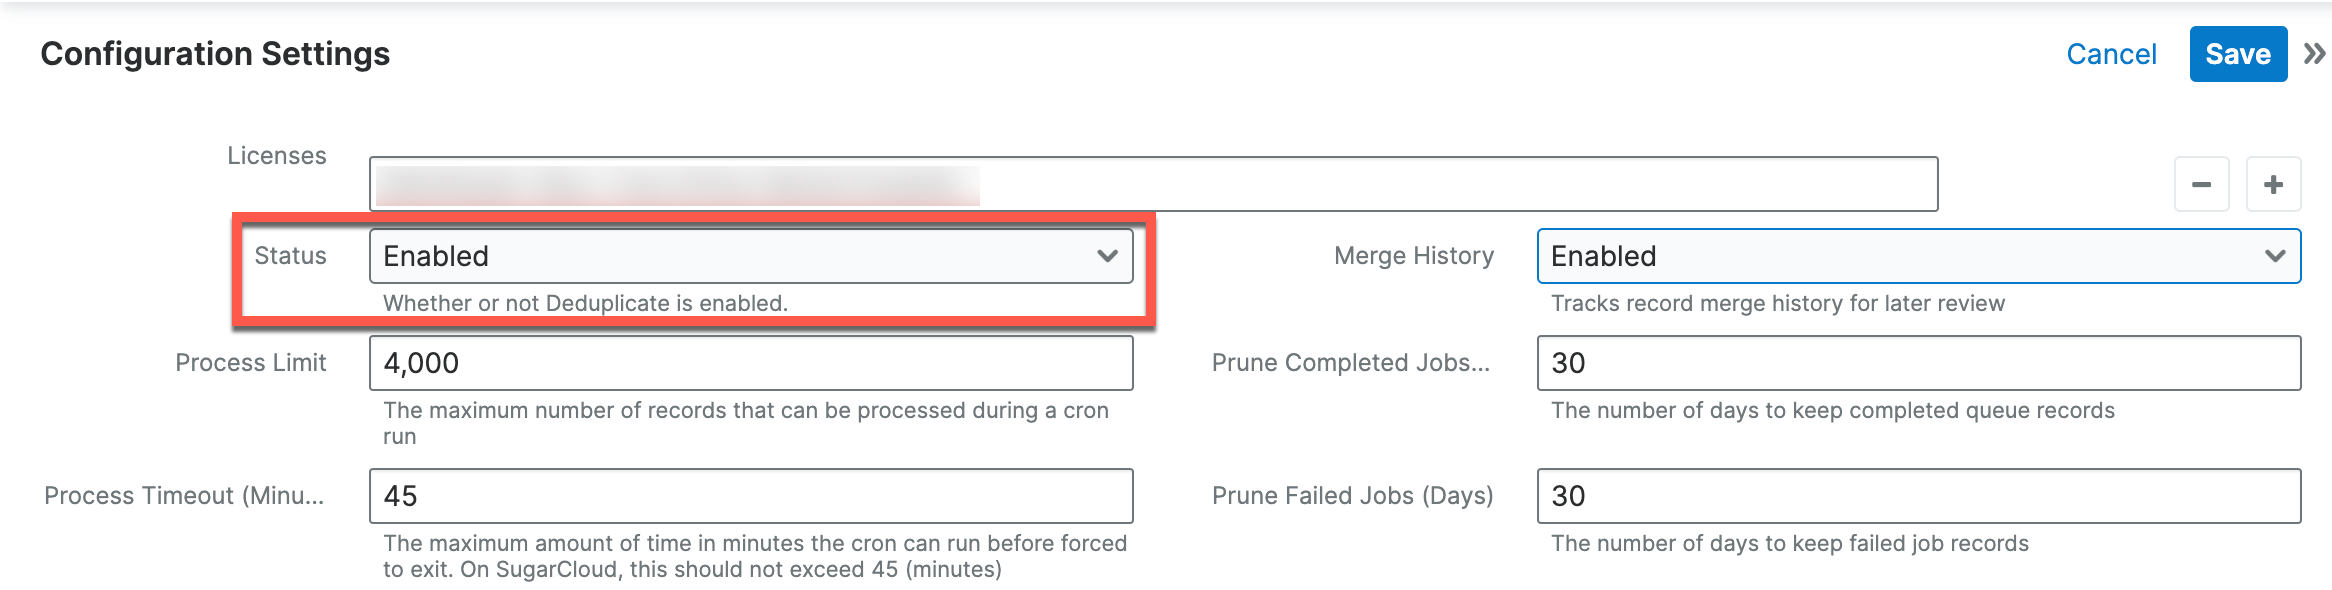
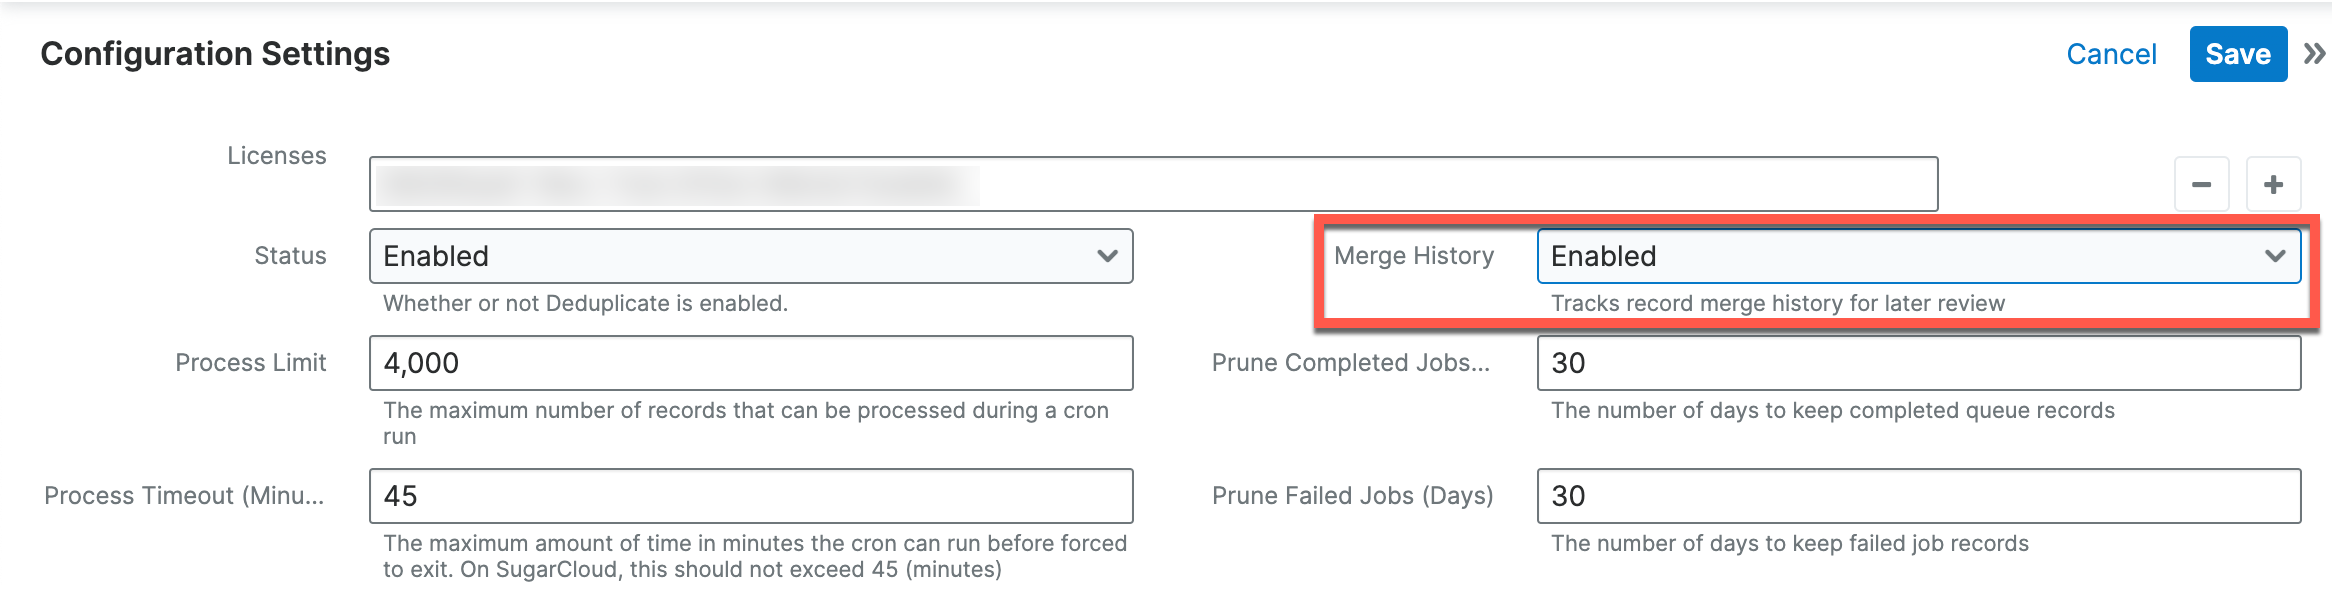
Merge History
If you want to retain a history of records merged through Upsert Deduplicate, set the ‘Merge History’ field to ‘Enabled’.
Advanced Settings
The following settings are recommended to be left at their default values. We only recommend modifying these settings after receiving advice from Upsert Support.
Process Limit
Upsert® Deduplicate allows administrative users to determine the maximum number of jobs that will be processed during a cron run.
Process Timeout (Minutes)
The ‘Process Timeout (Minutes)’ field determines the maximum amount of time the job can run before being forced to exit.
Estimation Approach
The ‘Estimation Approach’ field determines how to estimate the number of records per cron run.
Estimation Approach options:
- Average Execution Time: The number of records will be determined by the Process Timeout and the average time it takes a job to process in the cron run
- Maximum Execution Time: The number of records will be determined by the Process Timeout and the maximum time it takes a job to process in the cron run
- Minimum Execution Time: The number of records will be determined by the Process Timeout and the minimum time it takes a job to process in the cron run
Queued Job Timeout
The ‘Queued Job Timeout’ field determines the maximum amount of time in minutes a job can be in a ‘Queued’ status before being reset.
Prune Completed Jobs
The ‘Prune Completed Jobs’ field determines the number of days to keep completed job records.
Prune Failed Jobs
The ‘Prune Failed Jobs’ field determines the number of days to keep failed job records.
Prune Canceled Jobs
The ‘Prune Canceled Jobs’ field determines the number of days to keep canceled job records.
Deduplicate Module Settings
Upsert® Deduplicate allows administrators to perform duplicate checks for records associated with any module. A module must be added to the ‘Module Settings’ panel and enabled in order for any features of the plug-in to be available for that module. Note: It is recommended to only add modules to the Upsert Deduplication configuration during a maintenance window where users are not actively using the system. Adding a module causes cache files to be rebuilt which may disrupt work for any users logged into the system.
To add a new module:
- Go to Admin, and select ‘Configuration Settings’ from the Upsert® Deduplicate section
- Click the plus (+) icon at the top right of the ‘Module Settings’ panel
- Complete the fields for the new source:
- Module: A list of all modules available to check for duplicate records
- Module Status: Whether or not the module is enabled for duplicate checks
- Scheduler Status: Whether or not the module’s records will be processed for potential duplicates in a cron run.
Note: The Upsert® Deduplicate :: Process Duplicate Records scheduler must be active to scan the module for duplicates. - Scheduler Record Limit: the maximum number of records that can be processed during a cron run.
Note: We recommend keeping this setting at 500 unless otherwise advised by Upsert Support. - Auto Merge: Select whether users and scheduled queries will have the ability to automatically merge records
- Auto Merge Settings: Click ‘Select’ to define the rules on how auto merge operations will be performed. Refer to the Auto Merge Settings section for additional information on each merge rule’s settings.
- Click the ‘Done’ button at the end of the row to finalize the changes. As part of adding the module, a custom datetime field is added to the module called “Deduplicate Record Processed Date” to track when a record was last scanned by the scheduler. Do not delete this field from the module in Studio.
Note: Repeat Steps 1 through 3 until all desired modules have been added.
Auto Merge Settings
When enabling auto merge for a module, the following operations are enabled:
- Deduplication queries can be enabled to automatically merge duplicates found with the specified conditions
- Users will have the ability to select 2 or more records in the module list view and select ‘Auto Merge’ from the list view mass actions menu.
Note: If only 2 records are selected, then the auto merge is performed instantly. If 3 or more records are selected by the user, the auto merge operation will be queued for processing by the scheduled job.
When configuring the auto merge settings, you must define a strategy for the following scenarios:
- Primary record merge
- Field merge
- Child relationship merge
- Parent relationship merge
The strategies selected will serve as the default settings for any deduplication queries with auto merge enabled. The strategies can be adjusted within each deduplication query if you want to have different behaviors for different scenarios.
Primary Record Merge Strategy
When defining the primary record merge strategy, you have the following options to choose how Sugar will determine which record is the primary record in an auto merge operation.
| Strategy Option | Definition |
|---|---|
| Keep Current (default) | The record first selected by the user in the list view will be the primary record. |
| Keep Earliest Created | The record with the earliest created date will be the primary record |
| Keep Latest Created | The record with the latest created date will be the primary record |
| Keep Earliest Modified | The record with the earliest modified date will be the primary record |
| Keep Latest Modified | The record with the earliest modified date will be the primary record |
Field Merge Strategy
When defining the field merge strategy, you have the following options to choose how field-level data from merging records will be preserved:
| Strategy Option | Definition |
|---|---|
| Ignore | Only the field data in the primary record is preserved and all field data from the merging records is discarded |
| Keep Latest Modified | Keep the field value of the record that was most recently modified. If the field is audited, then the latest modified value will be determined by the most recent time that field was modified in all merging records. |
| Keep Latest Modified If Not Empty | Keep the field value of the record that was most recently modified as long as that field value is not empty. If the field is audited, then the latest modified value will be determined by the most recent time that field was modified in all merging records. (e.g. If you are automerging 3 records and the most recently modified record has a blank value for a field, then that record value would be discarded and the second most recently modified record would be merged assuming it contains a value.) |
| Populate If Empty (default) | If the primary record has an empty field value, the most recently modified field value from the merging records will be populated. |
If your field merge strategy option is not set to ‘Ignore’, you also configure which fields should be merged in the Selected Fields setting by selecting one of the following options:
| Selected Field Option | Definition |
|---|---|
| All (default) | All fields within the record are merged. |
| Allowed List | Only the specified fields in the ‘Fields’ selection will be merged. |
| Restricted List | All of the fields except for the specified fields in the ‘Fields’ selection will be merged. Note: The Studio setting for duplicate merge permissions on a field is ignored. A field must be restricted via this setting if you do not wish for its data to be merged. |
Child Relationship Merge Strategy
When defining the child relationship merge strategy, you have the following options to choose how related children records from merging records will be preserved: Note: Child relationships are defined as any relationship where the target module is either in a one-to-one, many-to-many, or the many side of a one-to-many relationship with another module.
| Strategy Option | Definition |
|---|---|
| Ignore | Only the child relationships to the primary record are preserved and all child relationships to the merging records is discarded |
| Keep All (default) | Designated child relationships from the merging records will be migrated to the primary record. |
If your child relationship merge strategy option is set to ‘Keep All’, you also configure which relationships should be merged in the Selected Relationships setting by selecting one of the following options:
| Selected Relationships Option | Definition |
|---|---|
| All (default) | All child relationships are merged to the primary record. |
| Allowed List | Only the specified relationships in the ‘Child Relationships’ selection will be merged. |
| Restricted List | All of the relationships except for the specified relationships in the ‘Child Relationships’ selection will be merged. |
Parent Relationship Merge Strategy
When defining the parent relationship merge strategy, you have the following options to choose how related parent relationships from merging records will be preserved:
Note: Parent relationships are determined as any relationship where the target module is the many side of a one-to-many relationship with another module.
| Strategy Option | Definition |
|---|---|
| Ignore | Only the parent relationship in the primary record is preserved and all parent relationships from the merging records are discarded |
| Keep Latest Modified | Keep the parent relationship of the record that was most recently modified. If the parent relationship is audited, then the latest modified value will be determined by the most recent time that relationship was modified in all merging records. |
| Keep Latest Modified If Not Empty | Keep the parent relationship of the record that was most recently modified as long as that relationship is not empty. If the parent relationship is audited, then the latest modified value will be determined by the most recent time that relationship was modified in all merging records. (e.g. If you are automerging 3 records and the most recently modified record has a blank value for a parent relationship, then that record value would be discarded and the second most recently modified record would be merged assuming it contains a value.) |
| Populate If Empty (default) | If the primary record has an empty parent relationship, the most recently modified field value from the merging records will be populated. |
If your parent relationship merge strategy option is not set to ‘Ignore’, you also configure which relationships should be merged in the Selected Relationships setting by selecting one of the following options:
| Selected Relationships Option | Definition |
|---|---|
| All (default) | All parent relationships are merged to the primary record. |
| Allowed List | Only the specified relationships in the ‘Parent Relationships’ selection will be merged. |
| Restricted List | All of the relationships except for the specified relationships in the ‘Parent Relationships’ selection will be merged. |
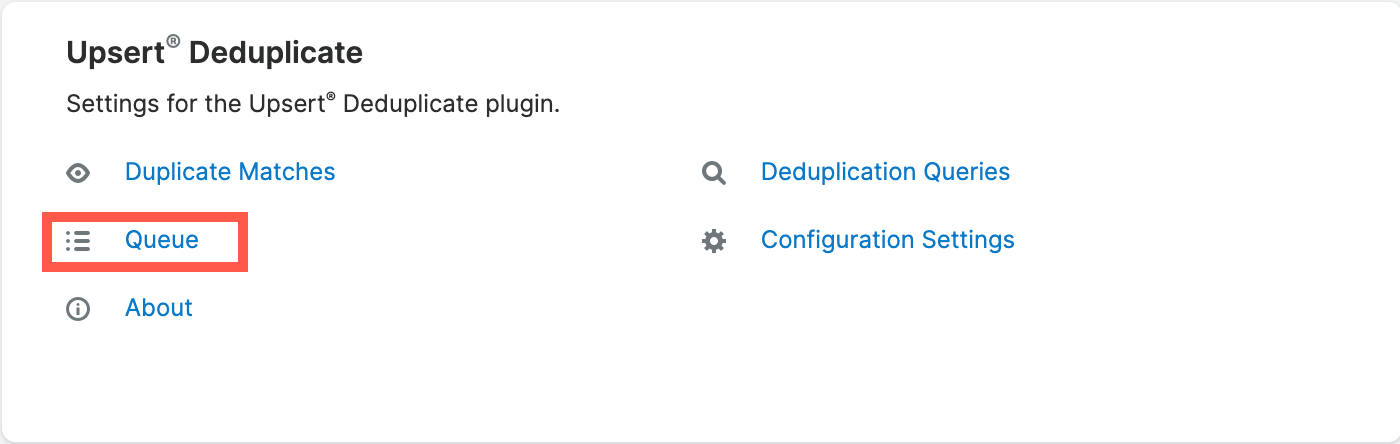
Queue
The Upsert® Deduplicate Queue module allows administrators to view jobs that have been processed or are waiting to be executed through a scheduler.
To access the Queue module, go to Admin, and select ‘Queue’ from the Upsert® Deduplicate section.
Upsert® Deduplicate :: Process Duplicate Records Scheduler
The Upsert® Deduplicate :: Process Duplicate Records scheduler scans for duplicates in a module provided the following criteria are met:
- The module’s Scheduler Status is set to ‘Enabled’ under Admin > Upsert® Deduplicate > Configuration Settings
- There is at least one deduplication query configured for the module with the status of ‘Enabled’
If the above criteria are met, the scheduler will retrieve records and scan for duplicates based on the enabled deduplication queries for the module in the following order:
- Records where the Deduplicate Record Processed Date field is empty
- Records with the oldest Deduplicate Record Processed Date value
Once a record has been scanned for any potential matches, the Deduplicate Record Processed Date field on that record is set to the current date and time.
Utilization
Once Upsert® Deduplicate is enabled, administrative users can create deduplicate queries, view potential duplicate matches, merge duplicate records, and view the merge history for records.
Deduplication Queries
Administrators identify duplicate records by creating custom queries with a combination of match conditions and filters. The module must be enabled for deduplication under the Configuration Settings in order for a query to be considered active. To create a new deduplication query, follow the steps below:
- Go to Admin, and select ‘Deduplication Queries’ from the Upsert® Deduplicate section.
- Click the ‘Create’ button from the module list view
Complete the fields for the query:
- Name: Choose a name that will briefly describe the query
- Status: Whether or not this query will be actively used to find potential duplicate records
- Auto Merge: Whether auto merge operations are enabled for the query. Once checked, a new tab ‘Merge Strategies’ is made available to define the auto merge rules for this query. For more information on the merge strategies, please refer to the ‘Auto Merge Settings’ section.
Note: This field will only show if the module selected for the query has auto merge enabled in Configuration Settings - Module: The module in which the query will be applied
- Assigned To: The user who is notified with any alerts pertaining to the query performance
- Match Conditions: Consists of a list of fields and operators available for those fields for creating the query
Note: At least one match condition is required to create a query- The first column contains the fields that can be used for the match condition
- The second column contains the list of operators associated with the chosen field for the match condition (i.e. exactly matches, starts with)
- Additional match conditions may be added to the query by clicking on the plus (+) icon at the end of the row
- Filter Conditions: Filter conditions are a complement to match conditions and are not required to create a query. For example, you may have a match condition set to ‘email address exactly matches’, but you want to ensure records with a blank email address are not considered as duplicates. In this use case, you would create a filter condition of ‘email address is not empty’ to eliminate those considerations. When creating a filter condition, you have the following columns to complete:
- The first column contains the fields that can be used for the filter condition
- The second column contains the operators associated with the chosen field
- The third column will optionally appear depending on the operator chosen and should be populated as desired
- Query Safety Limit: The query safety limit determines how many potential duplicates can be flagged for review or auto-merged before the query is disabled for review. This setting safeguards an unexpectedly aggressive set of conditions that would merge more records than desired. If the safety limit is reached, the query is set to a status of ‘Disabled’ and the assigned user is notified to either revise the conditions or increase the limit before re-enabling the query.
- Query Preview: Once the query is saved, a preview of an example database query used to identify potential duplicates will be visible in this field.
Once the query record is saved and enabled, the query will return potential duplicates when a module record is saved or a cron job is run.