Sugar 7 - Installation Guide
General Information
RT QuickBooks plugin simplifies your accounting and management needs by integrating Sugar & QuickBooks. This integration helps you achieve a panoramic view of the customer with just one integration into your Sugar system. Use QuickBooks to generate invoices, inventory and sales from your Sugar.
SugarCRM Versions/Editions
RT QuickBooks is compatible with the following Sugar editions: Professional
Following are the Supported Versions: SugarCRM 7.2, 7.5, 7.6, and up
Pre-requisites
- The popups should be allowed on your current browser. You can change your browser settings, See the following link: https://wiki.umbc.edu/pages/viewpage.action?pageId=1867972
- Cron Job must be setup on your Sugar instance to sync the data.
- You have a compatible version of QuickBooks Online.
- You have a compatible version of Sugar.
- You have admin access of Sugar.
- You have a developers account for QuickBooks.
Note: You can see the following link to make your developers account https://developer.intuit.com
Installation
On the Administration page click on “Module Loader” to install the package.

Browse the zip file and click on “Upload” button under Module Loader screen.

After uploading package, click on the “Install” button to install the package.

Click on “Commit” button to finish the installation.

On successful installation, a success message on a new page will be displayed.
 (Note: In case there is an older version installed, after clicking on the “Commit” button, a message will be shown to uninstall the previous package. See the Uninstall section of this document for uninstallation process.)
Configuration Settings
To configure your Sugar with QuickBooks, go to Admin and click on Synchronization Settings.

Go to the ‘SugarOutfitters License Management’ tab and add in the ‘SugarOutfitters License’. This can be found in the purchased package folder. (Note: License can be found on Outfitters or an email will be send to you with given package.)

Next go to the ‘QuickBooks Authentication Management’ tab.

To fill in the ‘Consumer Key’ and ‘Consumer Secret’, go to your QuickBooks Account and select the app to be used with SugarCRM. (Note: You should be logged in with your QuickBooks account. If you do not have account, see section Setup QuickBooks Online Developer Account. )

Once done, go to the Production tab.

Then go over to the ‘Keys’ tab below.

Copy the OAuth Consumer Key and OAuth Consumer Secret by clicking on the Copy button.

Copy them onto the Consumer Key and Consumer Secret fields in Sugar.

Next, click on the ‘Connect to QuickBooks’ connector.

A pop up appears prompting you to login into QuickBooks. Enter your credentials and click on the ‘Sign in’ button.

Click on the ‘Authorize’ button to authorize QuickBooks' access to Sugar.

Once verified, the pop-up will close and the apps will be connected.

After this setup, you can now set up sync directions and priorities according to your requirement. For this go to the Module Settings tab.

You can set the Sync Direction for different modules by clicking on the ‘Sync Type’ dropdown and selecting from the options.

For priority conflicts, you can select which side to give priority, in case there are changes to the same field on both sides. The side with the priority shall override the other one and sync to both sides. To do this select a side from the ‘Upon Conflict’ dropdown.

After making all the required changes, click on the Save button.

The Configuration is all done and your plugin is ready to be in use!
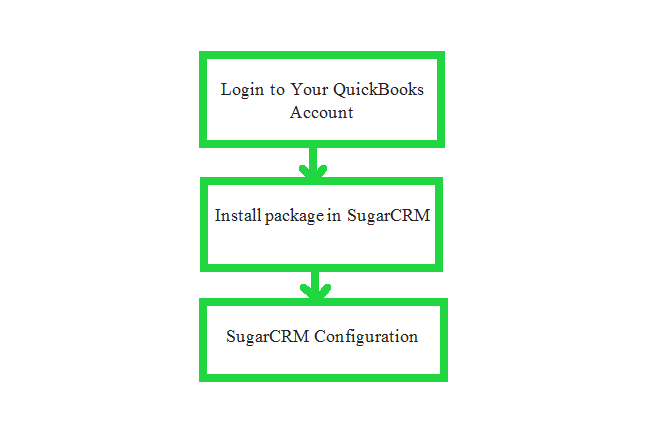
Basic Flow Diagram

Setup QuickBooks Online Developer Account
To setup your QuickBooks Developer account, go to https://developer.intuit.com/.

Then click on the ‘Sign in’ button on top of the page.

If you already haven’t signed up to QuickBooks, click on the ‘Create an account’ link.

Fill in all the required information and click on the ‘Create Account’ button.

Once done, you will receive an email to verify the account. To verify, click on the ‘Verify Email Address’ button.

Once done, you will be notified that the account has been verified.

After all the account setup, you will be redirected to the homepage. Here click on the ‘Select APIs’ button under the ‘Start Coding’ panel.

On the popup, select the ‘Accounting’ checkbox and then click on the ‘Create app’ button.

On the next popup, fill in the App name and other required information and then click on the Save button.

Now, your app has been created and you are all set to go!
Uninstall
To uninstall the RT QuickBooks package, follow the following instructions:
On the Administration page, click on “Module Loader”.

Click on “Uninstall” button.

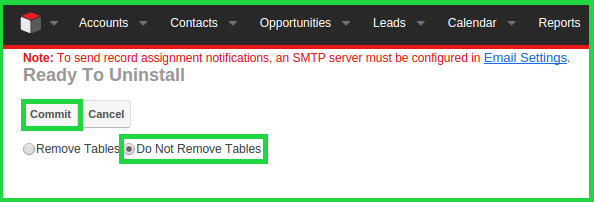
Then click on the Commit button on the new page. (Note: On this step select Do Not Remove Tables otherwise; your data will be lost.)

Package will be uninstalled successfully.


